Getting Started with Kova for Instructors
This guide takes you from your first sign-in to your first graded activity in about 20 minutes.
Taking a class? Getting started for students
1. Set up your class
Sign up at Kova with your school email and choose Educator. We email you a code to confirm your address.
Create your class from the class switcher at the top of the sidebar: + Add a class, then give it a name and a start date.
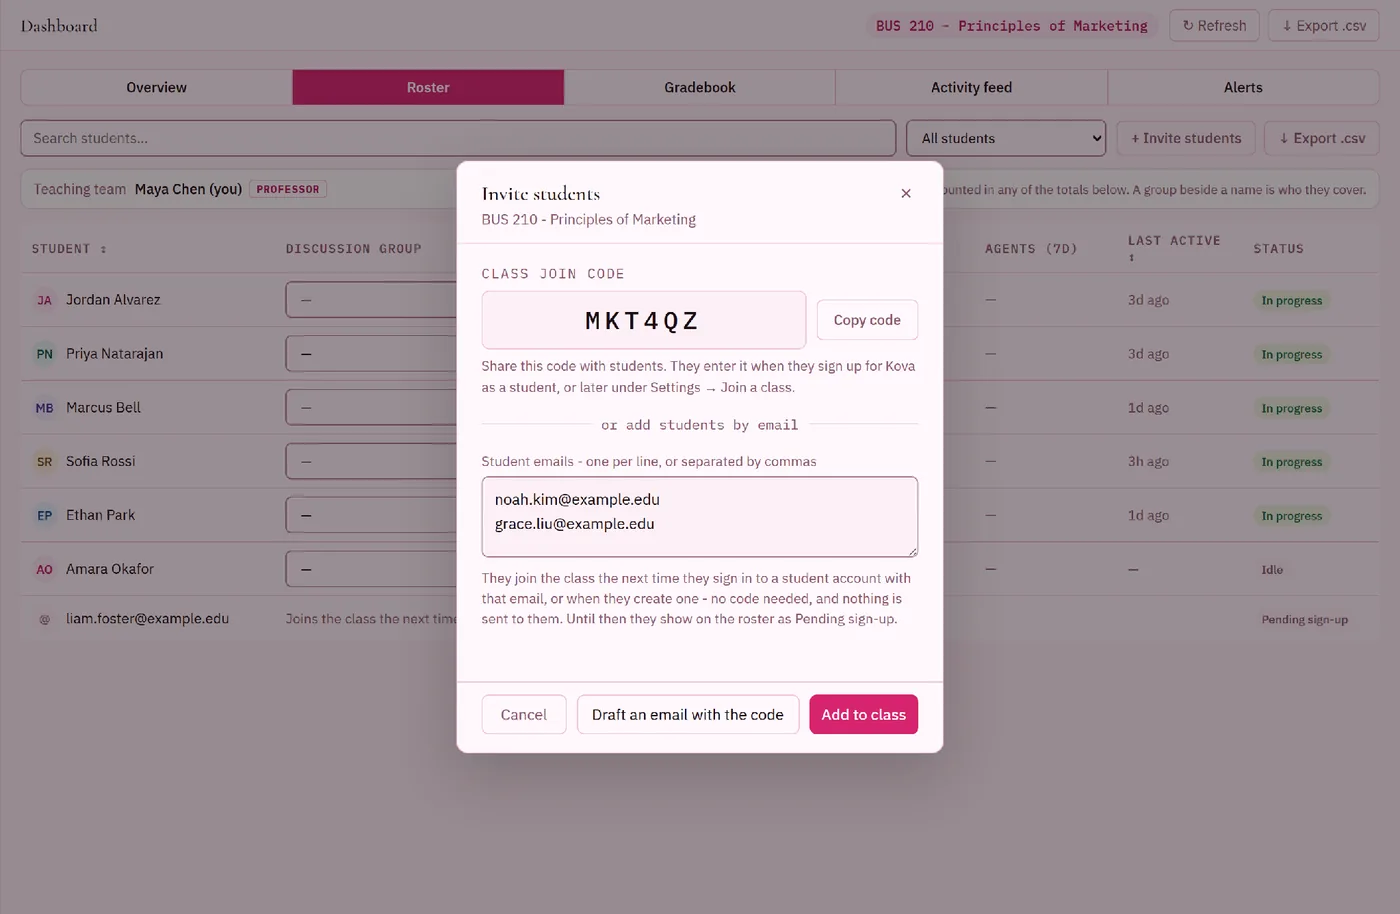
Add your students from the Dashboard roster, whichever way suits you:
paste a list of emails - students join automatically when they sign up, and no email is sent;
share the class join code - students enter it under + Join a class;
connect your LMS - Kova works with Canvas through LTI, so students arrive from your course.
Invite a TA from the same roster if someone helps you teach. TAs can build, grade and see the roster.
2. Build your course page
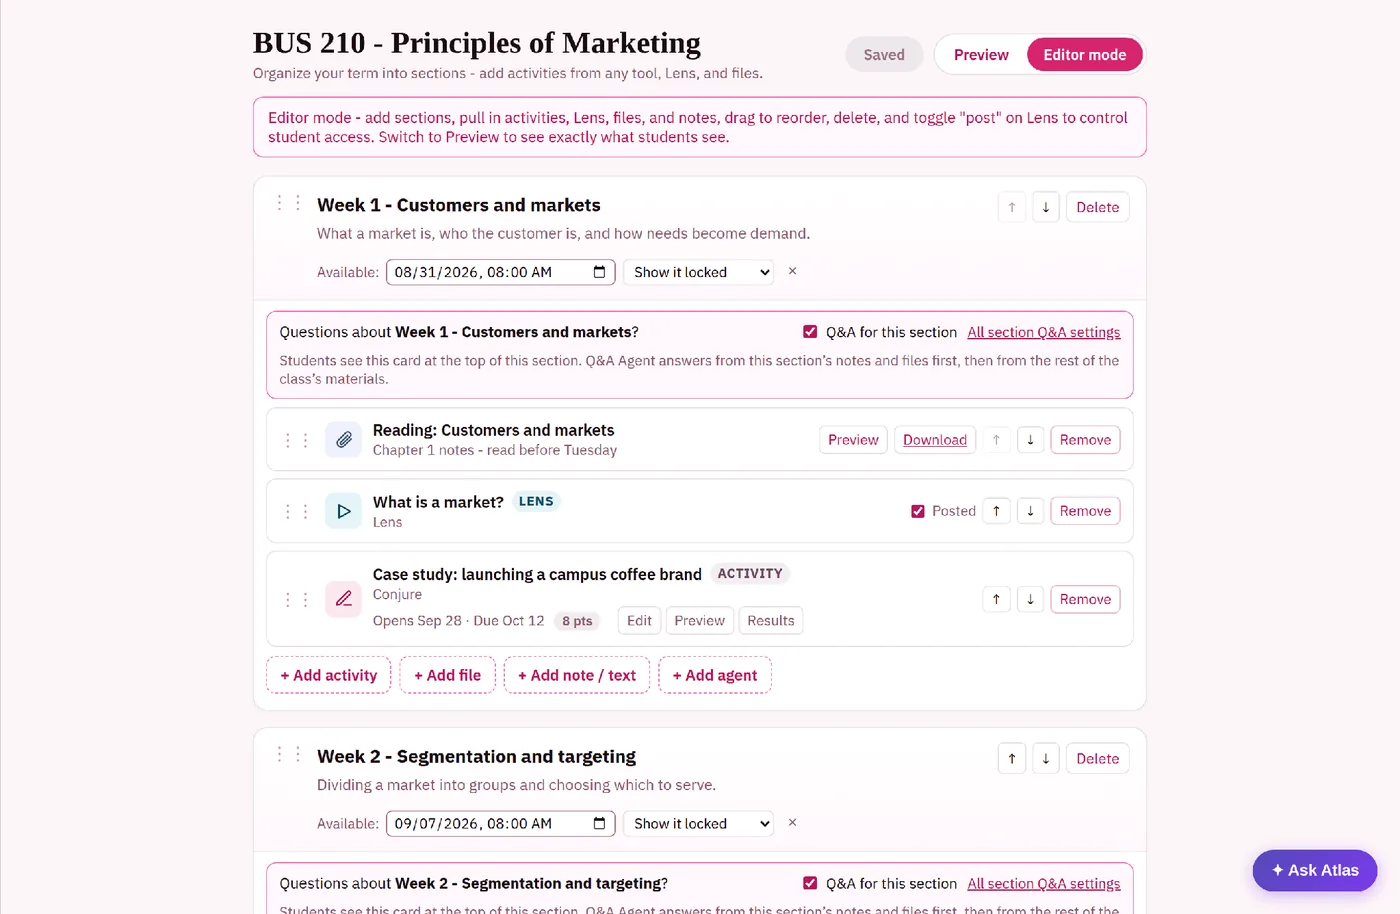
The course page is your students' home for the class: one place for every week's materials and activities.
Add sections for weeks or units, then add items to each: files, links, notes and Kova activities.
Each section gets a Q&A agent automatically. The section opens with "Questions about this section? Ask the Q&A Agent", and it answers from that section's materials. Turn it off with the section's Q&A for this section switch.
Add other agents to the page with + Add agent, such as a writing coach for the whole course.
Students see only what you have published, in the order you set.
3. Create activities with Conjure
Conjure turns a plain description of what you want students to do into an interactive activity you can edit block by block. Open Conjure and choose + New activity.
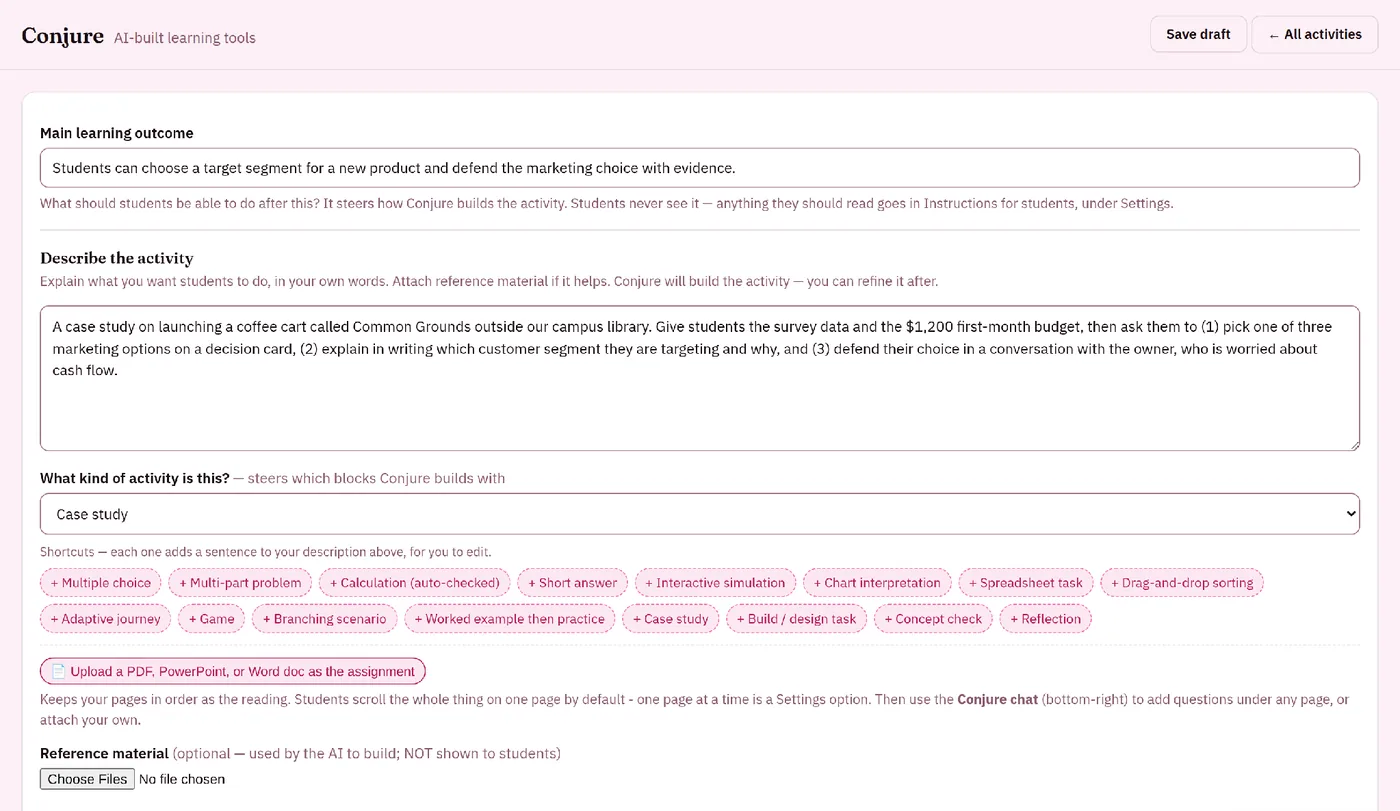
Describe it and generate
Main learning outcome (recommended) - one sentence on what students should be able to do. It steers the build; students never see it.
Describe the activity in your own words, as you would to a colleague. Be specific about the tasks, for example: "A case study on a campus coffee brand's launch. Give students the sales figures, ask them to recommend a price and defend it, then a conversation with the store manager who pushes back."
What kind of activity is this? (recommended) Pick one (Case study, Problem set, Scenario / role-play, Data analysis, Debate and more) or let Conjure decide.
Add your material if it helps:
Upload a PDF, PowerPoint, or Word doc as the assignment to use its pages as the reading with activities (e.g. click to reveal, prioritize choices, etc.) overlaid on top of the slides/pages.
Reference material is read by Conjure while it builds but never shown to students - use it for notes, readings or a rubric.
Advanced settings (optional) set the purpose, length, difficulty, the mix of auto-graded and open-ended questions, a grading rubric and Personalize to each student, which gives each student one story built from their major and interests while the questions and grading stay the same.
If the activity is planned to be a group activity, we recommend selecting “Group Work” in the “Work style” setting
Press Generate activity. If your description leaves things open, Conjure first asks a few questions - pick what fits, or choose Skip - build it as written. A build takes up to a minute or two.
Tips for good results
Name the blocks you want, such as "an AI conversation with the manager" or "a drag and drop"; Conjure always includes a block you name if we already have it built (otherwise it will build it from scratch). Say what to leave out too, such as "no sliders".
Ask for thinking, not just answers. Conjure favors written explanations, decisions students defend and conversations over multiple choice unless you ask for a traditional quiz.
Turn an old quiz into a scenario: upload a multiple-choice quiz and ask for a case study or simulation. Every question's idea and answer key is kept inside one story, with a debrief at the end.
Big projects: if you describe several tasks, Conjure offers to make linked activities - a Directions page plus one activity per task, each with its own grade and due date. Increase the build depth for bigger tasks such as this.
Edit what Conjure built
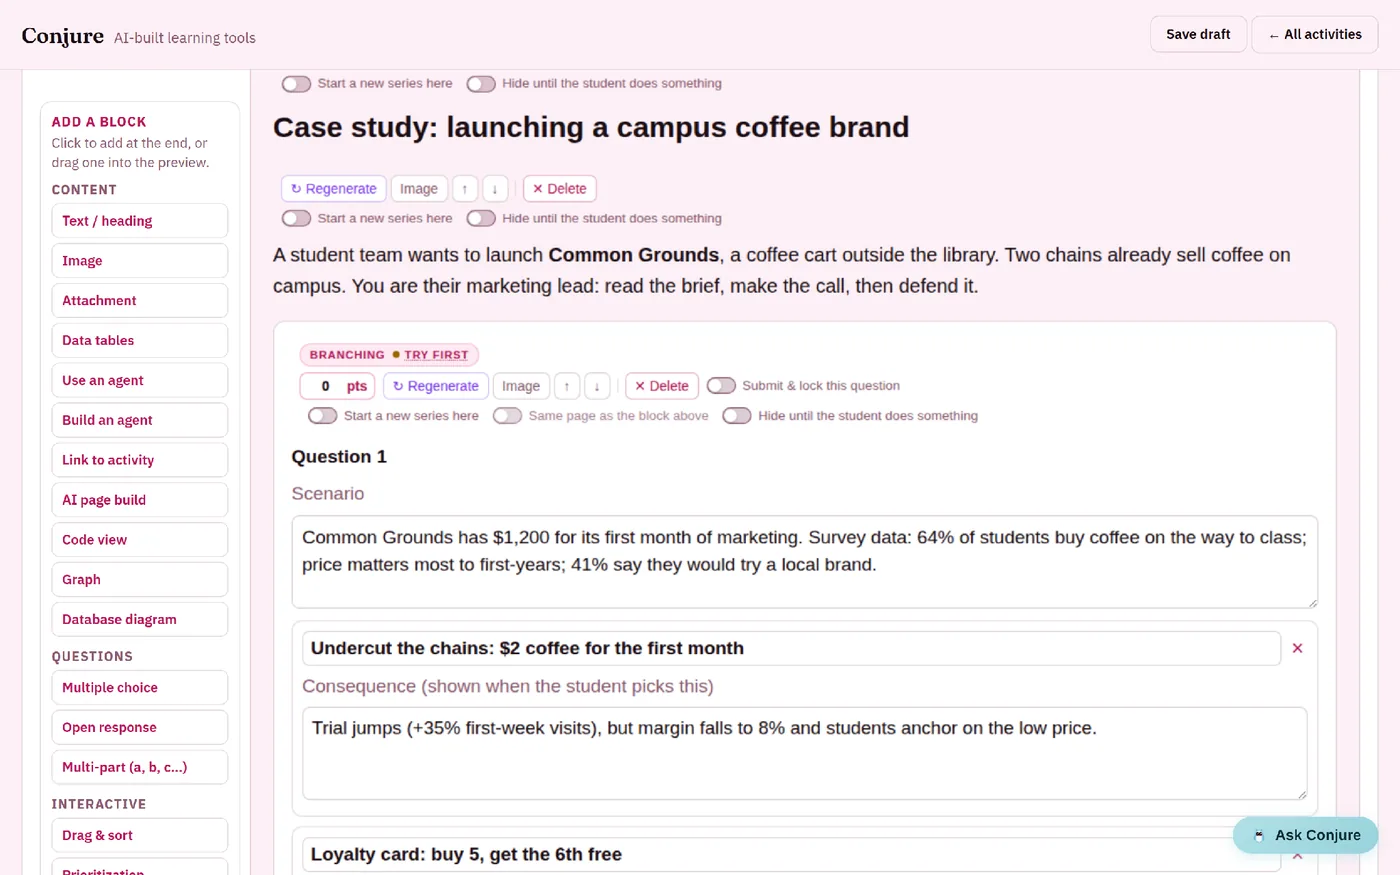
The Editor Preview shows the activity with answers visible. Switch to Student Preview to see exactly what students see.
Click any text to edit it directly.
Ask Conjure at the top, or press regenerate on each block for a change in plain words ("make question 2 harder"), or open Ask Conjure at the bottom right for a longer back-and-forth.
Add a block from the palette - click to add it at the end, or drag it into place. Blocks come in groups: content, questions, interactive (drag & sort, spreadsheets, discussions), immersive (AI conversation, negotiator, adaptive and AI-built parts) and flow (stage gates, timed unlocks).
Each block has a toolbar: Regenerate, move up or down, Alt text for images, and Delete.
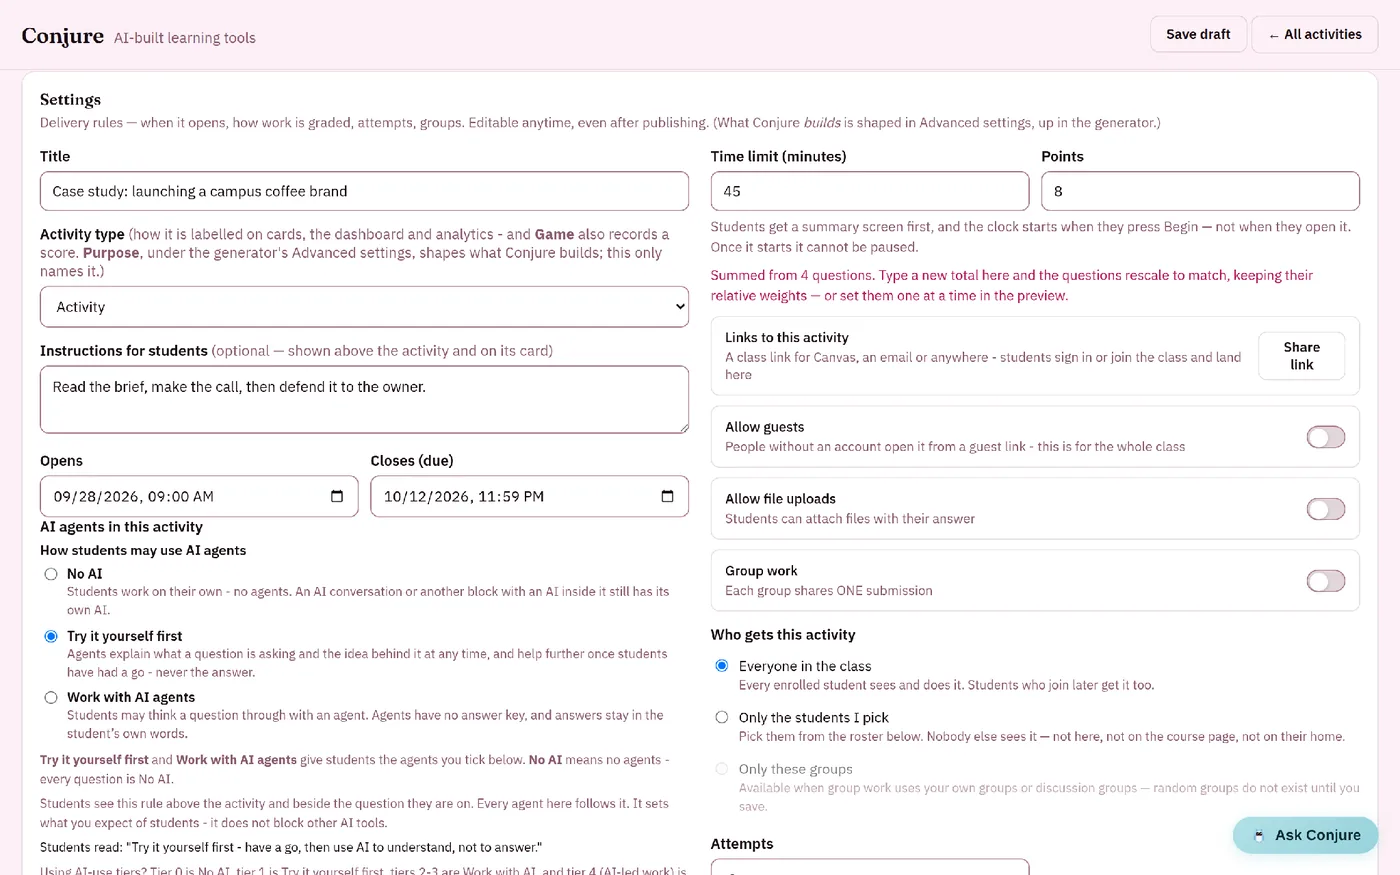
Choose the settings
Activity type, Opens and Closes (due), Points (which is summed up from the points in the activity unless you are purposely having a difference) and an optional Time limit.
AI agents in this activity - How students may use AI agents: No AI, Try it yourself first or Work with AI agents. Use Set it question by question to mix rules, and Directions for the agents to say what they may and may not help with. (More on agents below)
Grading, Results shown to students and Feedback to students - see section 6.
Group work (use if this assignment is to be done in groups), attempts, guests, late submissions and layout are in the right-hand column.
Save and publish
Save draft keeps your work private. Publish to students makes it live; after that, edits go out with Publish changes.
In the Activities list, each activity has Share link, Results, Close (stop new submissions) and Copy (start a new draft from it). Students find published activities under Assignments, and you can also add them to a section of your course page.
4. Set up Class Agents & Workspace
Agents are AI assistants for your class. They answer from the materials you choose, follow the rules you set, and show students where an answer came from. Open Agents & Workspace in the sidebar.
Set up the page
Choose Set up (later Edit agents):
What students will see this page called - rename it if you like.
Documents every agent reads - + Add documents for your syllabus or readings, or + Add text to type something in, such as office hours or late-work rules.
Built-in agents are ready to switch on:
Q&A Agent answers class questions and hands off to a specialist;
Mentor answers from your class materials and shows where;
Toolkit names the tool or framework that fits a problem and builds it as a Conjure activity.
Agents students make - Off, For themselves only, or And share them with the class.
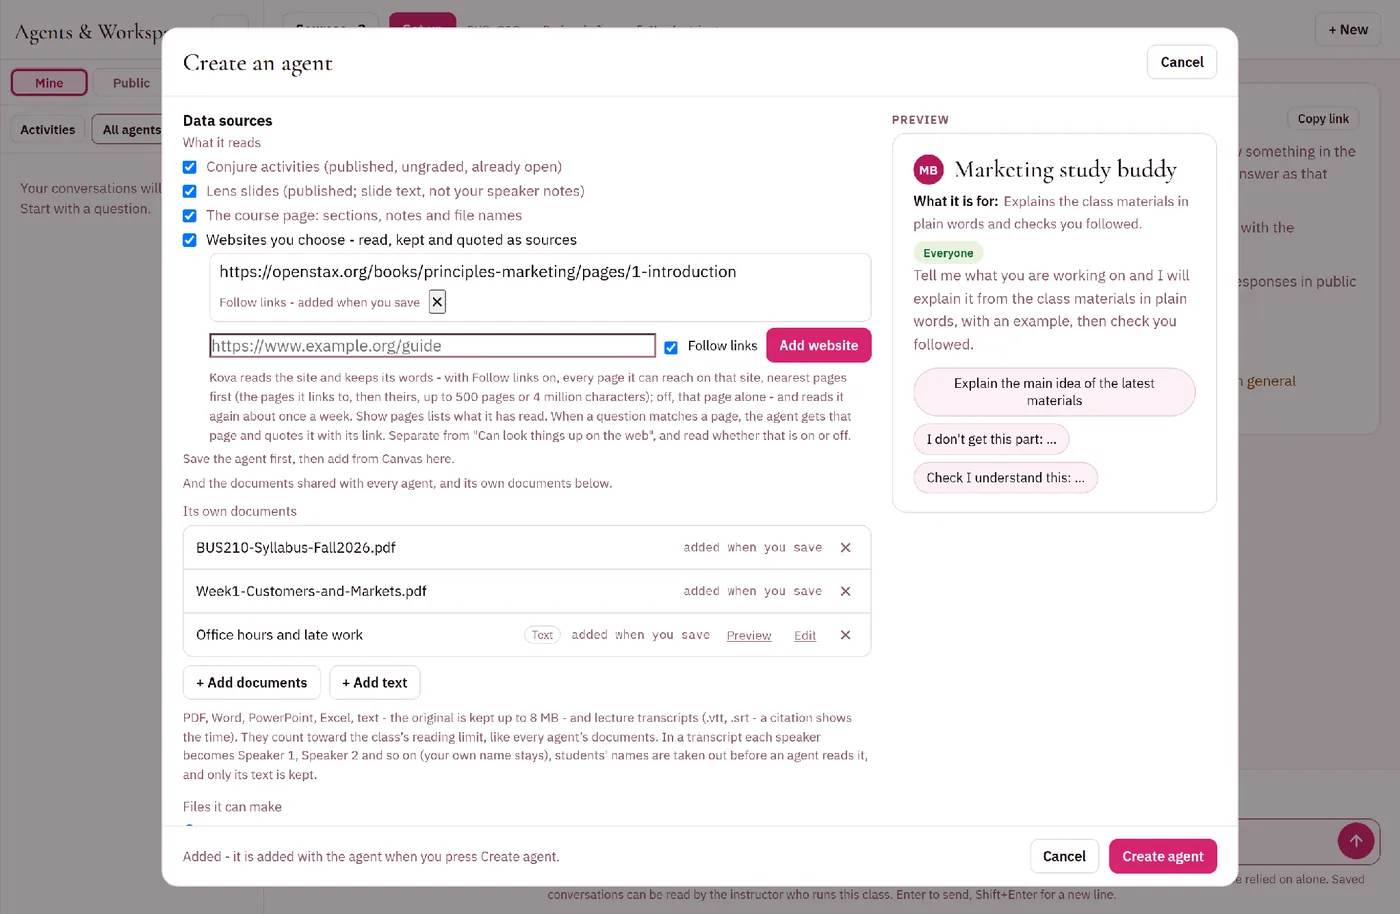
Create your own agent
Choose + Create an agent.
Start from a card - Study buddy, Quiz me, Debate partner, Writing coach, Project planner, Topic deep-dive, Q&A Agent or Group facilitator - or Or describe it and press Draft it for me (add up to 3 files for context). The AI fills in the form; nothing is saved yet.
Check the form:
Name, Picture, What it is for and an Opening line;
How it answers - Direct, Coach, Socratic, Challenger or Explainer;
Instructions and Conversation starters.
Data sources - what it reads:
your published Conjure activities, Lens slides and course page;
websites you choose (Follow links to read a whole site, or This page only);
its own documents: + Add documents, + Add text, or Add from Canvas.
Files it can make (for example, Word or PDF) and Who can use it - Only me, Everyone in the class or The teaching team only.
Try it, then Create agent. Not finished? Save draft keeps it hidden from students until you create it.
To put it on the course page, choose Place it on the course page.
Conversations
Students pick an agent under Talk to and chat Privately or Publicly; group chats let you Add people.
In a shared chat you can Pause the agent while people talk among themselves.
Any conversation can be downloaded as Word or PDF.
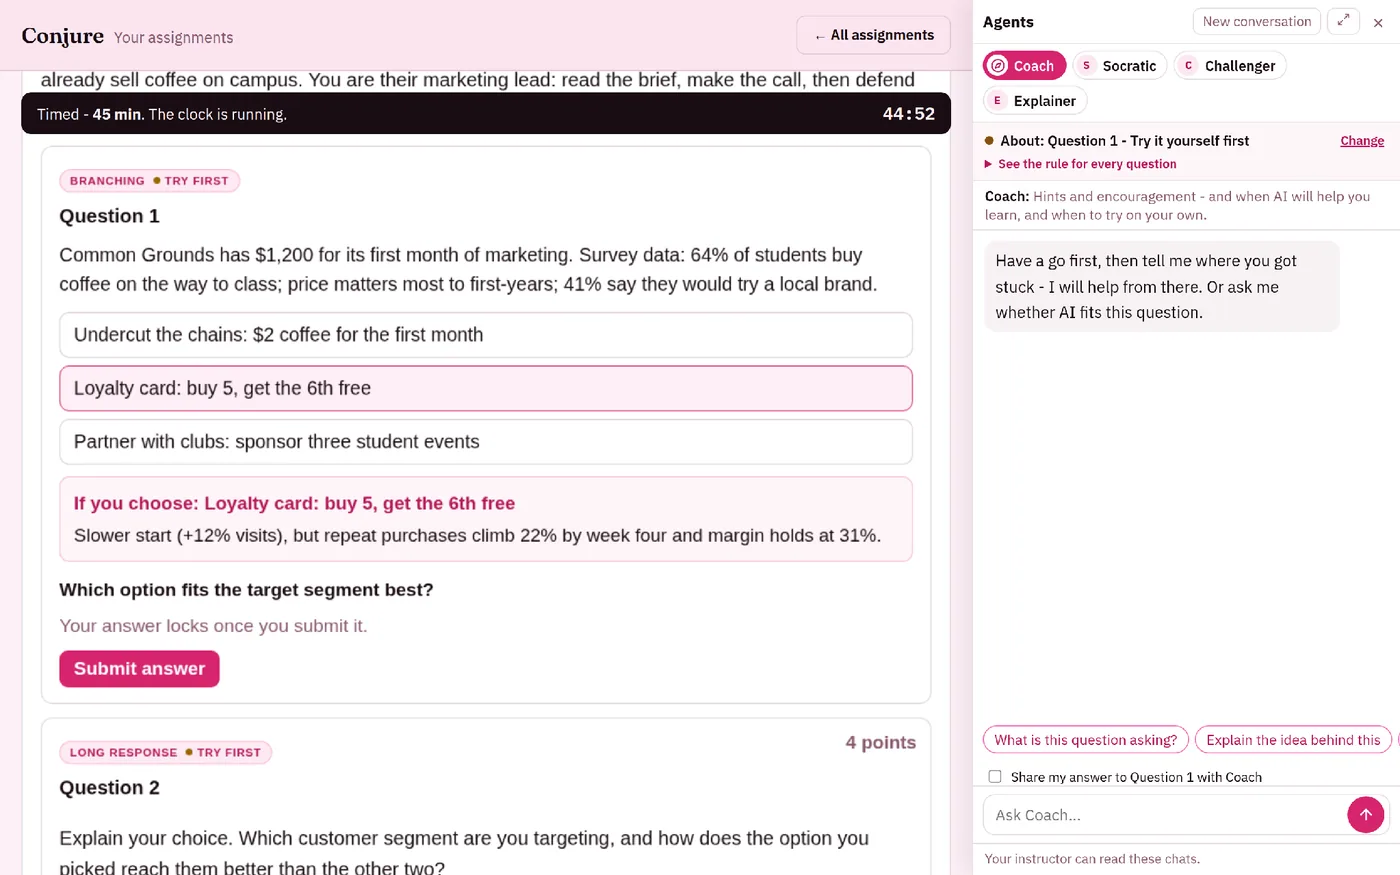
How agents behave inside Conjure activities
The activity's AI rule always wins over an agent's own instructions and a rule can be applied to each individual graded aspect:
| Rule | What agents do |
|---|---|
| No AI | Stay out of that activity/question entirely |
| Try it yourself first | Explain the activity/question and the idea, ask for the student's first attempt, and never give the answer |
| Work with AI agents | Think the activity/question through with the student or perform a task for the student; they have no answer key, and the answer stays in the student's own words |
5. Present with Lens
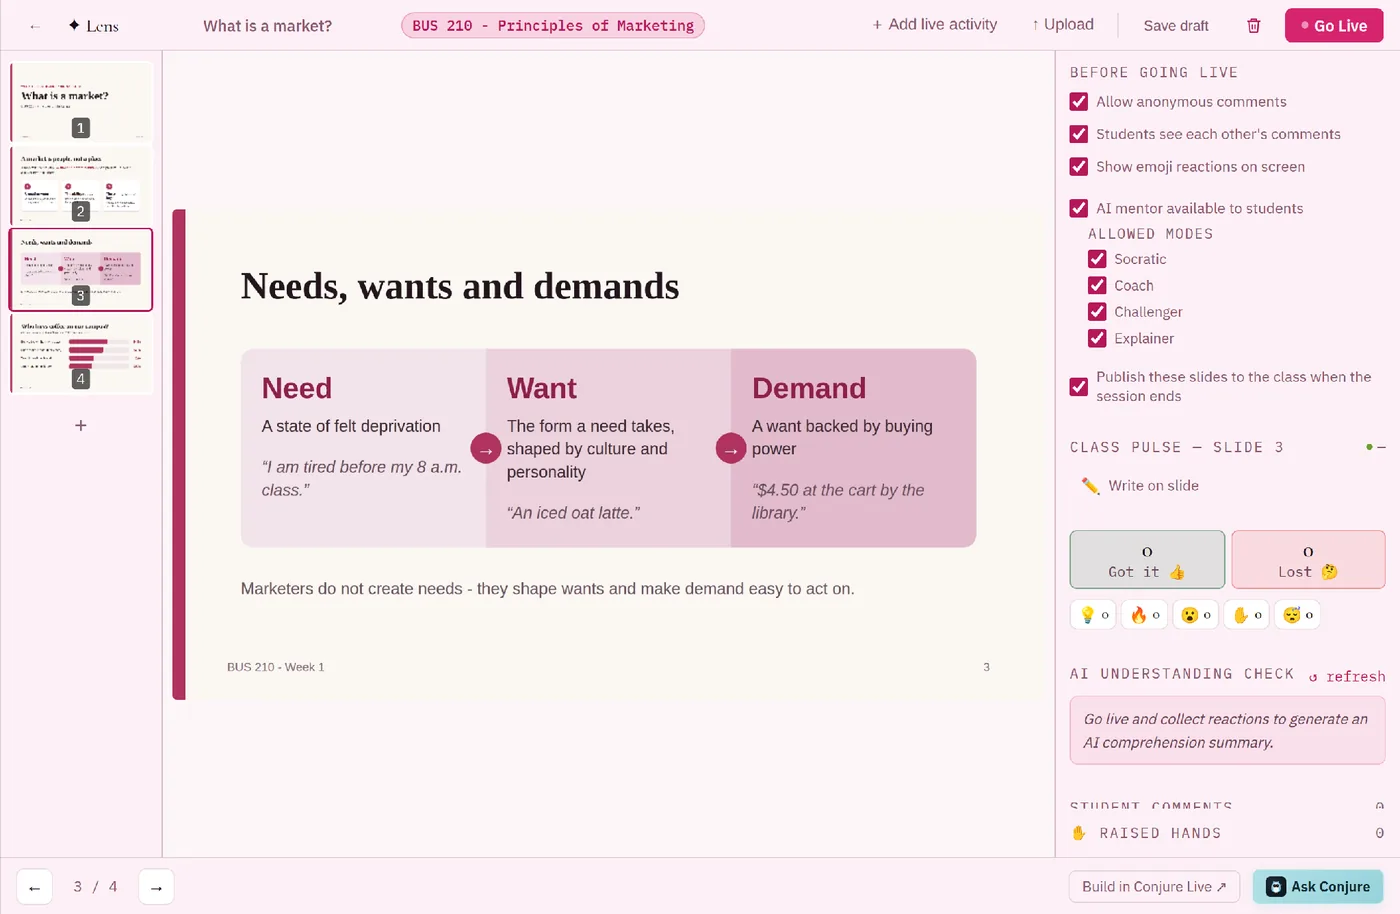
Lens is Kova's presentation tool for class time.
Build a deck in the Lens library: add slides, text and images.
Add a Conjure Live activity to a slide when you want students to do something during class, such as a quick simulation built by AI from your prompt.
Present full screen; students follow along on their own devices and can comment on slides.
6. Grade and give feedback
Every activity has its own results and feedback settings. Choose them in the right-hand column of the activity's settings in Conjure before you publish:
Results shown to students (right/wrong, correct answers and the score): Show after each question, After the assignment is submitted (recommended), Not until I release it, Once released & closed, or Closed & released by me.
Feedback to students (written comments on their work): After each question, After the assignment is submitted, After it is submitted and closed, Not until I release it, or None.
Grading sets how strictly answers are marked: Standard (AI lets answers varying from the key still get high scores if response was sound), Participation, Practice or Strict (AI is strict to the model answer for questions that could have potential other correct answers).
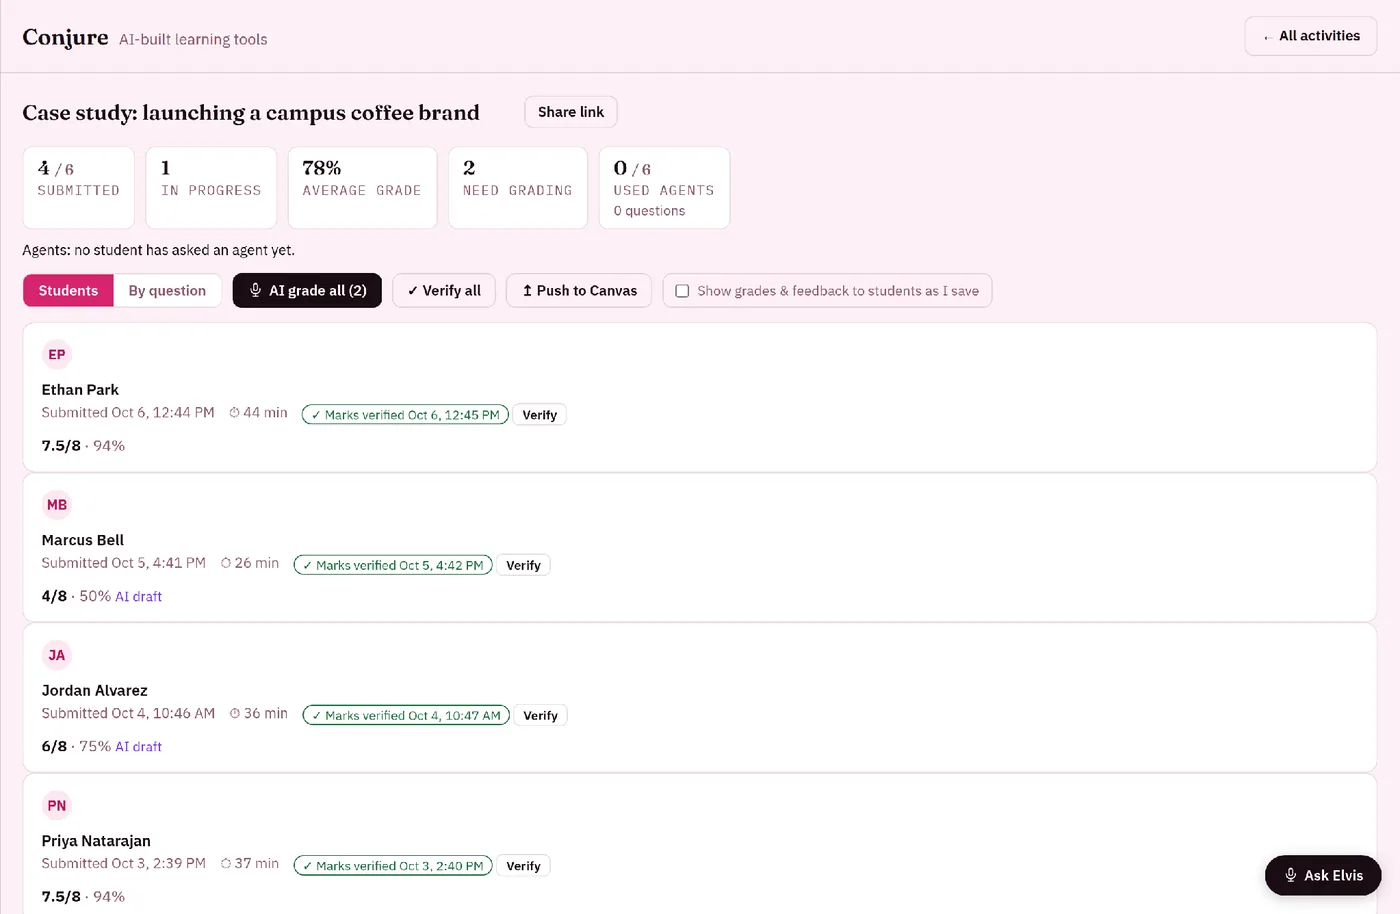
When results show right away, Kova grades each submission as it comes in. Open the activity's Results to review and adjust any grade.
When results wait for you (Not until I release it, Once released & closed, or Closed & released by me), you grade first and release when ready:
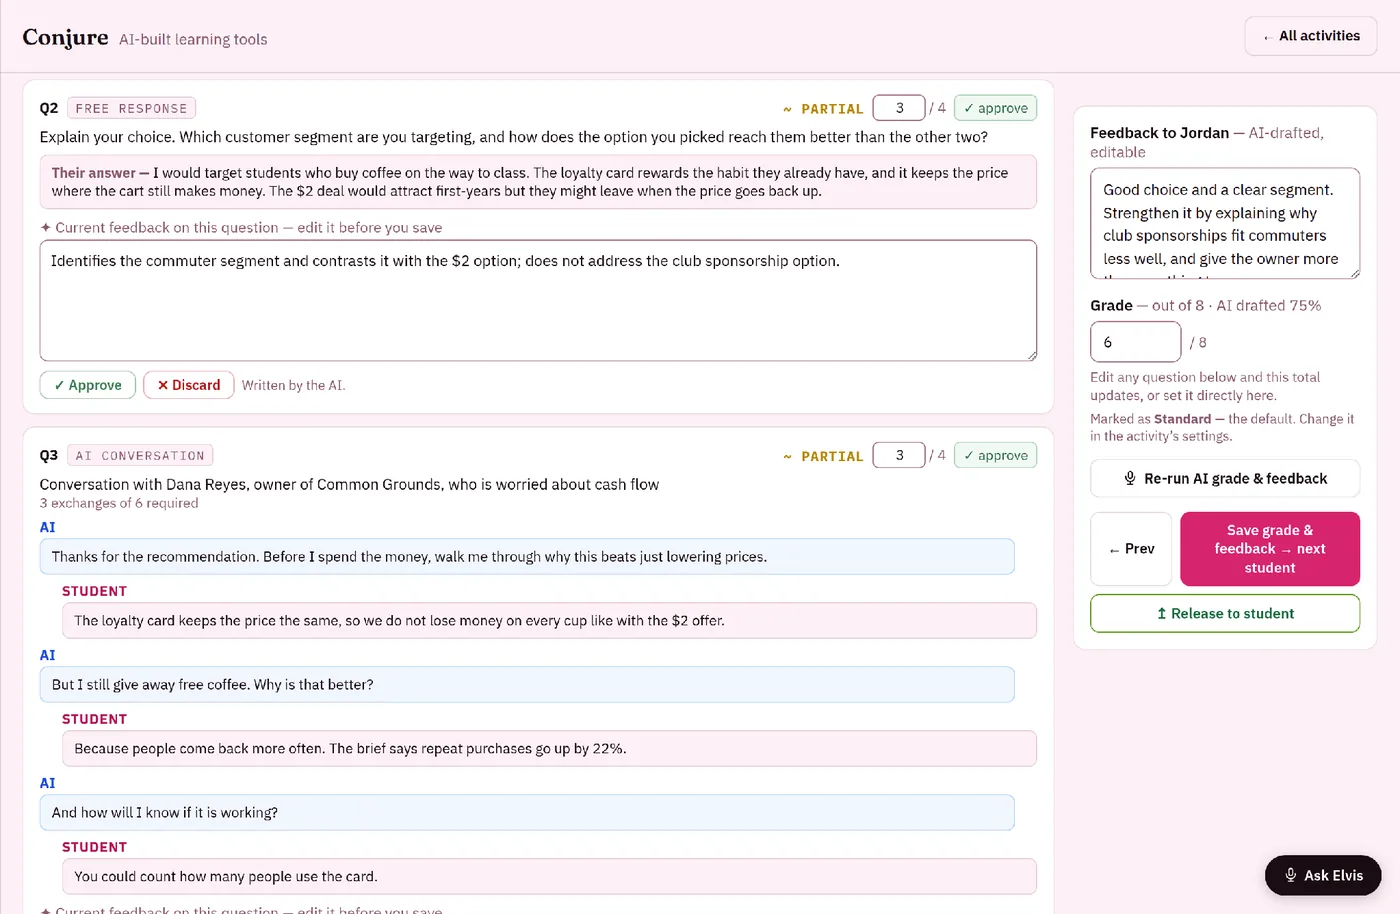
AI grade all drafts a grade and feedback for every submission from your answer key and rubric. It is only for activities set to wait for your release (any of those three settings); when results show right away, grading has already happened. Every AI-drafted mark carries an asterisk until you approve it.
Review and verify. Open a student, adjust points or feedback per question, then Save grade & feedback → next to grade.
Release to student when you are ready, or Release to all students at once; later changes go out with Push updates to student.
Push to Canvas in Results sends the grades to Canvas if your class is connected.
7. Support every student
Extra time: when an activity has a time limit, choose Extra time beside it to give a student time and a half, double time or extra minutes. It applies to every timed activity in the class, and only that student and your teaching team can see it.
AI rules per question: use No AI where you need to see a student's own work and With AI where the agents should help.
Accessibility: students can change the theme and text size in Settings, and every activity works with a keyboard and a screen reader.
Copy-and-paste protection is a class setting that blocks pasting for every student, including those who dictate or use word prediction, so turn it on only when you need it.
8. Get help
Help in the sidebar explains each part of Kova, and the Elvis assistant on Results and Analytics answers questions about your class's work.
Email support@kovaedu.com for anything else, including accessibility questions.
Kova's accessibility statement and conformance report are at kovaedu.com/accessibility.